
Despite its age and familiarity to most nowadays I couldn’t find a straight forward post on how to install and get started using Vagrant. So here are my notes on doing so in blog post format.
Be aware that this is well-trodden ground and the Vagrant documentation on their website has a similar set of steps and content. The official site, if not this will get you where you need to be when it comes to getting started with Vagrant.
1 – Install VirtualBox
Our provider choice will be VirtualBox. The provider describes the software in charge of creating then managing the virtual machines commissioned by Vagrant. The two major providers are VirtualBox and VMware, VirtualBox is free and open-source, whereas VMware is not.
Find the correct installation procedure for your flavor of Linux here.
On Ubuntu, you would add this line to the bottom of your sources.list file:
deb http://download.virtualbox.org/virtualbox/debian xenial contrib
Replacing xenial for your own distributions release codename.
[alert-announce]
- $ sudo vim /etc/apt/sources.list
[/alert-announce]
You can find this codename if you don’t already know it by running this command; back on the prompt.
[alert-announce]
- lsb_release -a
[/alert-announce]
For Debian 8 (“Jessie”) and Ubuntu 16.04 (“Xenial”) or later distributions. Download and add the repositories PGP key.
[alert-announce]
- wget -q https://www.virtualbox.org/download/oracle_vbox_2016.asc -O- | sudo apt-key add –
[/alert-announce]
Update the apt-get package database and install the virtualbox packages.
[alert-announce]
- $ sudo apt-get update
$ sudo apt-get install virtualbox
[/alert-announce]
VirtualBox is now installed and ready to use.
2 – Install Vagrant
Find the correct binary for your version of Linux, then download it with the URL and Wget.
Here’s the wget command and correct URL for downloading the latest version of Vagrant on Debian (at the time of writing this) – yours may differ.
[alert-announce]
- $ wget https://releases.hashicorp.com/vagrant/1.9.4/vagrant_1.9.4_x86_64.deb ~
[/alert-announce]
To then install the binary as a package on the system, use:
[alert-announce]
- $ sudo dpkg -i vagrant_1.9.4_x86_64.deb
[/alert-announce]
You can remove the Vagrant .deb build file from your user’s home directory now, after it’s been installed.
3 – Download and Use a Vagrant Box
Make a temporary test directory, and change into it, before continuing.
[alert-announce]
- $ mkdir ~/vagrant-test && cd vagrant-test
[/alert-announce]
To test the install, you can download and run a basic Vagrant box as a VM by running the next set of commands.
So we’re clear, here’s a good definition of a what a Vagrant “box” actually is:
“A package containing a representation of a virtual machine running a specific operating system. To be more simple, it is a base image of any Operating System or Kernel. It may be for a specific Provider.”
The box is the image, and from this image, a virtual machine (VM) is created on the localhost.
The basic Vagrant configuration for this VM will be based in one file, the Vagrantfile.
This file is placed in the ~/vagrant-test directory via:
[alert-announce]
- $ vagrant init ubuntu/xenial64
[/alert-announce]
There are a wide variety of different box types (various OS images) listed on Hashi corp’s Atlas index.
After issuing the next command Vagrant will start to download the box and attempt to create and run a VM through VirtualBox.
[alert-announce]
- $ vagrant up
[/alert-announce]
Here’s an example of what the progress output looks like for this:
[alert-announce]
Output:
- ==> default: Box ‘ubuntu/xenial64’ could not be found. Attempting to find and install…
- default: Box Provider: virtualbox
- default: Box Version: >= 0
- ==> default: Loading metadata for box ‘ubuntu/xenial64’
- default: URL: https://atlas.hashicorp.com/ubuntu/xenial64
- ==> default: Adding box ‘ubuntu/xenial64’ (v2017.05.01) for provider: virtualbox
- default: Downloading: https://vagrantcloud.com/ogarcia/boxes/archlinux-
- x32/versions/2017.05.01/providers/virtualbox.box
- ==> default: Successfully added box ‘ubuntu/xenial64’ (v2017.05.01) for ‘virtualbox’!
- ==> default: Importing base box ‘ubuntu/xenial64’…
- ==> default: Matching MAC address for NAT networking…
- ==> default: Checking if box ‘ubuntu/xenial64’ is up to date…
- ==> default: Setting the name of the VM: vagrant-testing_default_1494195673719_66642
- ==> default: Clearing any previously set network interfaces…
- ==> default: Preparing network interfaces based on configuration…
- default: Adapter 1: nat
- ==> default: Forwarding ports…
- default: 22 (guest) => 2222 (host) (adapter 1)
- ==> default: Booting VM…
- ==> default: Waiting for machine to boot. This may take a few minutes…
- default: SSH address: 127.0.0.1:2222
- default: SSH username: vagrant
- default: SSH auth method: private key
- default:
- default: Vagrant insecure key detected. Vagrant will automatically replace
- default: this with a newly generated keypair for better security.
- default:
- default: Inserting generated public key within guest…
- default: Removing insecure key from the guest if it’s present…
- default: Key inserted! Disconnecting and reconnecting using new SSH key…
- ==> default: Machine booted and ready!
- ==> default: Checking for guest additions in VM…
- default: The guest additions on this VM do not match the installed version of
- default: VirtualBox! In most cases this is fine, but in rare cases it can
- default: prevent things such as shared folders from working properly. If you see
- default: shared folder errors, please make sure the guest additions within the
- default: virtual machine match the version of VirtualBox you have installed on
- default: your host and reload your VM.
- default:
- default: Guest Additions Version: 5.1.22 r115126
- default: VirtualBox Version: 5.0
- ==> default: Mounting shared folders…
- default: /vagrant => /home/scarlz/vagrant-testing
[/alert-announce]
You can get an error message here relating to CPU architecture if you use a box that isn’t intended for your host’s operating system.
For example, the first image here requires a 64-bit host operating system, and then the second is for a 32-bit version. The “host” here refers to the machine you installed Vagrant on.
In my example, we used the first box, a 64-bit system.
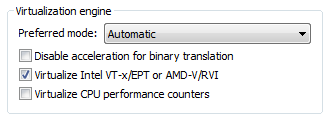
Also if you are running Vagrant itself in a virtual machine (using a hypervisor). Then you’ll need to ensure your hypervisor has “VT-x/AMD-V enabled”.
To enable this you’ll have to do something along the lines of:
- Power off the host virtual machine.
- Edit the individual virtual machine’s settings.
- Go to the CPU/processors section.
- Enable “VT-x/AMD-V” / “Virtualise Intel VR-x/EPT and AMD-V/RVI”
- Then power on the virtual machine again.
- Re-run
vagrant upin your Vagrant testing directory.
Here is what the setting looks like when using VMware Workstation as your hypervisor.
4 – Connect to a Running VM
Once a box is installed and configured to run in a VM (like in step 2), you connect to the VM through an SSH tunnel created by Vagrant.
To connect to the new running VM with Vagrant use:
[alert-announce]
- $ vagrant ssh
[/alert-announce]
The prompt now shows you are connected to your new VM!
[alert-announce]
prompt example
- ubuntu@ubuntu-xenial:~$
[/alert-announce]
Type exit or use CTRL + D to leave the VM’s command line and return to your host.
5 – Vagrant Sub-commands
These are the commands you’ll find yourself using when working with Vagrant. They use subsets of subcommands – which may seem confusing at first glance. The first is box and has several susbets. Not all, however, have them.
Box
List all the boxes you currently have installed on the host.
[alert-announce]
- $ vagrant box list
[/alert-announce]
Remove an already existing box from Vagrant.
[alert-announce]
- $ vagrant box remove ubuntu/xenial64
[/alert-announce]
Check updates for all box images on your system.
[alert-announce]
- $ vagrant box update
[/alert-announce]
Many of these commands can have the box named appended to them. In order to single them out.
Destroy
The Vagrant documentation sums this command up pretty well:
“This command stops the running machine Vagrant is managing and destroys all resources that were created during the machine creation process. After running this command, your computer should be left at a clean state, as if you never created the guest machine in the first place.”
Use it to destroy your created virtual machines e.g.
[alert-announce]
- $ vagrant destroy ubuntu/xenial64
[/alert-announce]
halt
This command shuts down the running virtual machine Vagrant is currently managing; you can add a machine name/ID to target specific VM’s
[alert-announce]
- $ vagrant halt
[/alert-announce]
reload
This is the same as a vagrant halt but restarts the VM after halting – like with vagrant up.
[alert-announce]
- $ vagrant reload
[/alert-announce]
port
This allows you to list all the Vagrant guest ports that are mapped to the host ports.
[alert-announce]
- $ vagrant port
[/alert-announce]
ssh_config
Useful for displaying the output of the Vagrant host side SSH configuration file.
[alert-announce]
- $ vagrant ssh-config
[/alert-announce]
Returns:
[alert-announce]
Example Output
- Host default
- HostName 127.0.0.1
- User ubuntu
- Port 2222
- UserKnownHostsFile /dev/null
- StrictHostKeyChecking no
- PasswordAuthentication no
- IdentityFile /home/scarlz/vagrant-ubuntu-test/.vagrant/machines/default/virtualbox/private_key
- IdentitiesOnly yes
- LogLevel FATAL
[/alert-announce]
6 – Miscellaneous
Should there ever be any SSH connection issues to a VM. The connection log can be seen by appending --debug to the command.
[alert-announce]
- $ vagrant ssh –debug
[/alert-announce]
Note: This
--debugflag can be added onto most Vagrant commands to see the internal operations being carried out.
Checking the status of the current Vagrant virtual machine is possible by entering:
[alert-announce]
- $ vagrant status
[/alert-announce]
A global version also exists.
[alert-announce]
- $ vagrant global-status
[/alert-announce]
Adding the --prune flag updates the cache for this – thereby removing any old, dead entries from the output.
[alert-announce]
- $ vagrant global-status –prune
[/alert-announce]
Looking back to the Vagrantfile configuration. We can see that there are different options on offer to configure the resultant VM(s).
One to highlight is the VM name that is assigned to both the provider (VirtualBox) and the internal Vagrant machine “name”.
This is the code to explicitly define it in both instances if you ever want to:
[alert-announce]
Vagrantfile
- Vagrant.configure(VAGRANTFILE_API_VERSION) do |config|
- config.vm.define “ubuntu_test_vm” do |vmname|
- end
- config.vm.provider :virtualbox do |vb|
- vb.name = “ubuntu_test_vm”
- end
- end
[/alert-announce]
Line 3 determines the "name" listed when issuing: vagrant global-status
Whilst line 5/6 ensures VirtualBox names and displays the VM properly in its GUI.

7 – Autocompletion
A nice addition to Vagrant is shell auto-completion (Bash shell) for when typing in the above commands. An up to date (at the time of writing this) repo which provides this is located here:
This is a fork of Kura’s old repo; thanks go to him for maintaining this up until now. Here’s the provided “easiest” method of downloading this functionality to your Linux/Unix host system.
wget the script file in the above repo.
[alert-announce]
- $ wget -q https://raw.github.com/brbsix/vagrant-bash-completion/master/vagrant-bash-completion/etc/bash_completion.d/vagrant
[/alert-announce]
Add the newly-downloaded file to the system Bash completion directory – whilst modifying the file’s permissions.
[alert-announce]
- $ sudo install -m 0644 vagrant /etc/bash_completion.d/
[/alert-announce]
Now either close and re-open your terminal, or source in the new /etc/bash_completion.d/vagrant bash-completion file. To get the new auto-completion working.
Learn more from this infographic:

Image: Leanpub